
My second card for last week’s Stamp Review Crew blog hop was this card for my SIL’s birthday in early February. Along with the featured set, Go-To Greetings, I used Decorative Borders, a set I received at November’s Stampin’ Up! OnStage gathering in Indianapolis. That was the first in-person event in three years, and how I missed it! Although my head nearly exploded with all the ideas presented, I’m a little ashamed to say I have yet to look at the notes I took throughout the day!
I actually began this card by choosing this fetching pattern from the Dandy Designs 12″ x 12″ Designer Series Paper pack — a FREE Sale-A-Bration choice when your product order reaches at least $100. With 48 double-sided sheets (four of each design), this is a great deal!
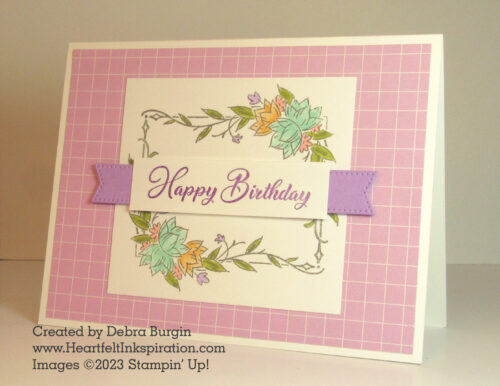
I used one of my favorite techniques for the sentiment strip, but it’s unlikely you can actually see it here. In order to give more weight to an image without using a darker color, stamp it in Classic Ink and quickly (run!) pour clear embossing over it before the ink dries; heat to melt the powder, as usual. Not only does the image become raised, it also becomes somewhat darker.
There’s no big trick to the flagged banner that runs behind the sentiment, except that there isn’t a die that long. So I cut it in two and used my Grid Paper to make sure the ends were straight and even.
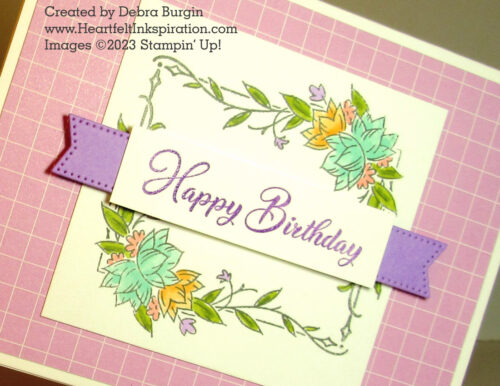
The floral image is a corner, so of course I had to stamp it twice to get a continuous border. Because this set is photopolymer and I used Basic Gray ink (instead of a lighter color), it was actually pretty easy to stamp the second image so that the dots at each end matched the ones already stamped. Of course, I was also clenching my teeth, which probably helped.
I used assorted Stampin’ Blends markers to color these two corners but haven’t included them in the product list. Use your favorites!
Click the images below to add current products for this card to your cart in my Stampin’ Up! online store. Disclosure: I get a commission for purchases made through these links, at no additional charge to you. Thank you!

")


 Designer Series Paper")


")


Pingback: Decorative Borders: Happy Birthday version C - Heartfelt InkspirationHeartfelt Inkspiration