To be honest, I have bought Stampin’ Up! products that (a) I never used, or (b) I didn’t understand how to use, or (c) someone talked me into buying and I was too weak to resist. Are you with me on this?
One of those items is Embossing Paste — or rather was, until I practiced using it in preparation for the Marvelous Masks class a few months ago. So simple! So WOW! (It’s not just me; in the new Annual Catalog, it’s on the page entitled The Wow Factor.)
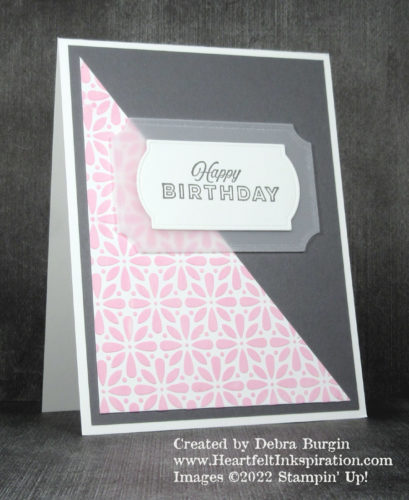
For this card, participants adhered a panel of Thick Basic White to their workspace Grid Paper, then secured the mask to the front. A drop of ink refill was all it took to tint a bit more than a teaspoon of Embossing Paste on a plastic palette (OK, the lid of a yogurt tub). And although Stampin’ Up! offers a pack of Palette Knives, I found a wooden craft stick (larger than a popsicle stick) worked perfectly to mix and “scrape” the mixture across the mask, forcing it through the holes of the mask.

When you’re done, the mask should have almost no paste left on it. Then you must remove the mask from the cardstock and wash the mask. Don’t wait to do this, or it will dry like cement! Meanwhile, set the pasted panel to the side to dry thoroughly. We cut the dry panel in half diagonally to use on a bonus card.
I’m not sure if you can tell how cool this technique is. The result is a very slightly raised, textured design — don’t envision a frosted cupcake! I wanted to show off as much of the design as I could, so I matted the sentiment label with a larger one cut from Vellum.
Click the images below to add current products for this card to your cart in my Stampin’ Up! online store. Disclosure: I get a commission for purchases made through these links, at no additional charge to you. Thank you!
 |
 |
 |
")